Installing and Managing Agents
Print Tracker utilizes data collection agents -- lightweight software applications installed within customer networks -- to discover and collect data from your devices. The agents are available for Windows, Mac, and Linux operating systems and can be installed using a variety of methods, including email, direct download, and command line.
Datalink Code
When an agent is installed inside your customers network, it needs to know how to upload that data to you. Print Tracker connects data collected from your customer's network to your account using a unique identifier called a Datalink Code. This code is a unique identifier that is generated for each entity in your account.

You can get the datalink code for an entity by:
- Navigating to the entity you'd like to get the datalink code for
- Using the sidebar, click Installs > Deploy install
- Copy the datalink code from the Datalink code field
Deployment Strategies
There are several different ways that you can deploy the Print Tracker data collection agent depending on your use-case. For example, if you're on-site at a customer's location, you may choose to download the agent directly to the customer's computer and install it manually. Or, if you're working remotely, you may choose to send the agent to the customer via email and have them install it themselves. You might even have remote administration access to a fleet of computers, in which case you can deploy the agent using the command line.
Once the agent is installed, it also needs to be registered. The process connects this agent to your account so that you can manage and collect data from it.
Deployment Email
The deployment email strategy allows you to easily send a link to the installer directly to your customer, along with instructions on how to register the agent.

To send a deployment email:
- Select the entity that you'd like the install to be associated with.
- Using the sidebar, click Installs > Deploy install
- Click Send installation email
- Enter the email address of your customer's on-site contact
- Click Send email.
Your customer will receive instructions on how to download and register the agent
Download and Install
You may choose to download the agent directly to the computer that you're working on right now. You can find all Print Tracker downloads by navigating to printtrackerpro.com/download, or picking the appropriate download for your operating system below.
Command Line
In some cases, it may be easier to deploy the agent using the command line. This is especially true if you have remote administration access to a fleet of computers that all need to be installed with the agent. Currently, only Windows and Linux support command-line installation.
If you'd like to install and register the agent in the same command, please skip to Automatic Registration.
Installation
- Windows
- Linux
You must run the Powershell window as an administrator in order to install the agent. If you do not, the installation will silently fail.
- Open a Powershell window as an administrator
- Copy and paste the following command into the Powershell window and press enter
- This command will download the latest version of Print Tracker and install it
- Once the installation is complete, open localhost:1301 to register the agent with your datalink code
$webClient = New-Object System.Net.WebClient; $version = $webClient.DownloadString('https://www.cdn.printtrackerpro.com/modules/dca/current_major_version').Trim(); $url = "https://www.cdn.printtrackerpro.com/modules/dca/$version/PrintTrackerProOfflineSetup.msi"; Write-Host "Version: $version"; Write-Host "Download URL: $url"; $output = Join-Path -Path $([System.IO.Path]::GetTempPath()) -ChildPath 'PrintTrackerProOfflineSetup.msi'; Write-Host "Download Path: $output" $webClient.DownloadFile($url, $output); Start-Process 'msiexec' -ArgumentList @('/qn', '/i', "`"$output`"") -Wait;
You must have sudo access in order to install the agent. If you do not, the installation will fail.
- Open a terminal window
- Run the following command to download and install the agent
- Once the installation is complete, open localhost:1301 to register the agent with your datalink code
source <(curl -fsSL https://www.cdn.printtrackerpro.com/modules/dca/install.sh)
Automatic Registration
In addition to installing the agent using the command line, you can also use the command line to register the agent.
- Windows
- Linux
You must run the Powershell window as an administrator in order to install the agent. If you do not, the installation will silently fail.
- Open a Powershell window as an administrator
- Copy the following command
- Replace
<YOUR DATALINK CODE>with your datalink code - Run the command to download and install the agent
$webClient = New-Object System.Net.WebClient; $version = $webClient.DownloadString('https://www.cdn.printtrackerpro.com/modules/dca/current_major_version').Trim(); $url = "https://www.cdn.printtrackerpro.com/modules/dca/$version/PrintTrackerProOfflineSetup.msi"; Write-Host "Version: $version"; Write-Host "Download URL: $url"; $output = Join-Path -Path $([System.IO.Path]::GetTempPath()) -ChildPath 'PrintTrackerProOfflineSetup.msi'; Write-Host "Download Path: $output" $webClient.DownloadFile($url, $output); Start-Process 'msiexec' -ArgumentList @('/qn', '/i', "`"$output`"", 'DATALINK_CODE=<YOUR DATALINK CODE>') -Wait;
You must have sudo access in order to install the agent. If you do not, the installation will fail.
- Open a terminal window
- Copy the following command
- Replace
<YOUR DATALINK CODE>with your datalink code - Run the command to download and install the agent
datalink_code='<YOUR DATALINK CODE>'; source <(curl -fsSL https://www.cdn.printtrackerpro.com/modules/dca/install.sh)
Installation
Once the agent has been downloaded and installed, the last step is registration, which connects your Print Tracker account to the agent installed within your customer's network. An agent that is not registered to your account will not appear in Print Tracker.
Registration
To register an agent, make sure the agent has been downloaded and installed using one of the deployment strategies. Once the agent has been installed:
- Open localhost:1301 in the web browser of the computer that the agent is installed on
- Enter your datalink code
- Click Register
Clustering and Redundancy
Clustering is the idea of installing multiple agents on the same network so that if one agent goes down, another agent can take over. Print Tracker automatically clusters agents that are registered using the same datalink code. This means that if you have multiple agents installed at the same entity, they will automatically cluster together without requiring any additional configuring from you.
When multiple agents are installed on the same network, devices, meters, and all other collected data is de-duplicated automatically.
Manually Upgrading
By default, installs automatically upgrade themselves within 24-48 hours of a new release. You can also manually upgrade an install to the latest version at any time.
To manually upgrade an install:
- Using the sidebar, click Installs > View installs
- Find the install that you want to upgrade
- Click the three-dot menu icon in the last column on the right side of the table
- Click Upgrade install
Within a few minutes the install will upgrade itself to the latest version. If the install is unable to upgrade itself, please check the troubleshooting section for more information.
Stale Agents
A stale agent is an agent that is no longer connected to Print Tracker. Installs usually check-in every 30-minutes, however, some installs may not check in for longer periods of time if the computer is shutdown, or enters sleep mode. Installs that are offline for extended periods of time (several days) can be problematic. For example asn agent that is offline for an extended period of time may have missed critical device alerts, such as a supply being replaced. When a stale agent comes back online it is important to review all your devices to make sure you haven't missed any critical events.
Deactivating/Reactivating
You can deactivate an agent at any time. Deactivating an agent will hide the agent from your account. Deactivating an agent will not uninstall the agent from the computer it is installed on. If you want to uninstall the agent, you must do so manually.
Deactivated agents stop checking in to Print Tracker regularly, and instead, check in only on system restart. This means that if you reactivate a deactivated install, it may not come back online until the computer is restarted.
You should only deactivate agents that you don't plan on using again. If you plan on using an agent again in the future, you should leave it activated.
Deactivating

To deactivate an agent:
- Using the sidebar, click Installs > View installs
- Find the install that you want to deactivate
- Click the Checkbox Icon on the left side of the table
- At the top of the table, click the down arrow next to table's checkbox icon
- Click Disable selected
Reactivating

To reactivate an agent:
- Using the sidebar, click Installs > View installs
- Make sure that the Exclude inactive filter is disabled
- Find the install that you want to reactivate
- Click the Checkbox Icon on the left side of the table
- At the top of the table, click the down arrow next to table's checkbox icon
- Click Enable selected
Uninstalling
Uninstalling Print Tracker must be done directly on the computer where Print Tracker is installed. This process varies depending on the operating system.
- Windows
- macOS
- Linux

- Open the Windows Start Menu
- Search "Add or remove programs" and open it
- Search for "Print Tracker Pro"
- Click the three-dot menu icon next to "Print Tracker Pro"
- Click Uninstall
- Follow the prompts to complete the uninstallation
- Open a terminal window
- Copy and run the following command
- Follow the prompts to complete the uninstallation
sudo bash /Library/PrintTracker/DataCollectionAgent/uninstall.sh
- Open a terminal window
- Copy and run the following command
source <(curl -fsSL https://www.cdn.printtrackerpro.com/modules/dca/uninstall.sh)
Supported Operating Systems
Print Tracker installs are designed to be compatible with all currently supported Windows, macOS, and Linux versions. Troubleshooting and support for installs running on older operating systems is not guaranteed to be provided. Please see the system requirements for more details.
Finding Unsupported Operating Systems
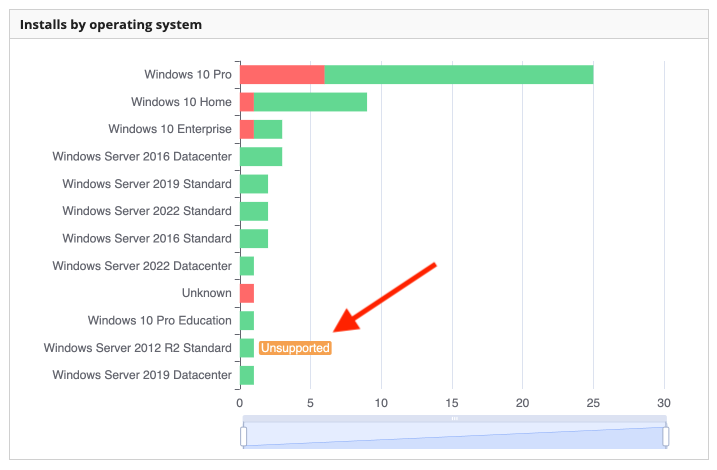
It's important to periodically review your install fleet to make sure that you're not running any unsupported operating systems. You can find unsupported operating systems by:
- Using the sidebar, click Home
- Click the Install tab.
- Under the section Installs by operating system
- Click on any row in the chart that says Unsupported
- Review the Installs table below the chart to see which installs and customers are running unsupported operating systems.
Troubleshooting
For more details on troubleshooting issues with your agents, see the Troubleshooting section.
macOS Installer Packages
Some macOS devices may pop up a warning indicating that the .pkg cannot be opened. This is because Print Tracker is not notarized by Apple and made available via the Apple App Store.

To bypass this warning, see the following step-by-step guide based on your macOS version:
- MacOS Sequoia+ (15 and up)
- MacOS Sonoma (14 and below)
- If you get a warning that the file cannot be opened, click Done.
- Open the System Settings application.
- Using the sidebar, find Privacy & Security
- Scroll down to the Security section where you should see a warning message like "PrintTrackerPro.pkg" was blocked to protect your mac.
- Click Open Anyway, and when prompted again, click Open Anyway a second time.
- You may be prompted for your password or biometric authentication. Enter your password or use your fingerprint to continue.
- Right-click on the file in your Finder window.
- Click Open
- Click Open again
- Follow the installation prompts.
